OPENVAS FREE
OPENVAS FREE at a Glance
OPENVAS FREE is our cross-platform (Windows/Linux/Mac) entry-level virtual appliance that provides new users with a quick and easy way to experience OPENVAS for the first time – ideal for private use and non-professional IT infrastructures. It uses the OPENVAS COMMUNITY FEED instead of the OPENVAS ENTERPRISE FEED and includes a limited set of functions which are only available in our enterprise level products.
Before you try out our OPENVAS FREE, consider a trial of our entry-level enterprise product OPENVAS BASIC or check out the comparison of our products. If you are still interested in OPENVAS FREE just send us a request using the contact form below.
OPENVAS FREE – Get Your Free Download
Simply follow the instructions for your desired virtual environment to set up OPENVAS FREE.
VMware Workstation Pro
1. Instruction
Requirements
- Compatibility: VMware Workstation Pro 16 or higher
- Minimum requirements: 2 CPUs, 5 GB RAM
- Virtual network adapter with direct Internet connection
Note: With default settings, OPENVAS FREE uses bridged networking and expects an IP address from a DHCP server. This may be reconfigured.
Importing OPENVAS FREE
- Download OVA file OPENVAS FREE.
- Download and install VMware Workstation Pro for the operating system used.
- Start Workstation Pro.
- Select File > Open… in the menu bar or click Open a Virtual Machine in the Home area.
- Select the OVA file of the appliance in the file system.
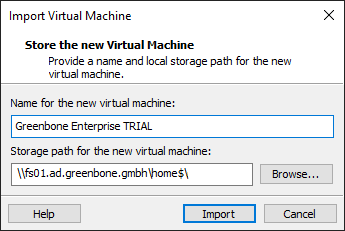
- Click Import.
→ The appliance is being imported. This process can take up to 10 minutes.
When the appliance has been imported, it will appear in the left column in Workstation Pro. - In Workstation Pro: select the appliance in the list and click Power on this virtual machine.
→ The administration menu is opened.
Performing a General System Setup
- Log in using the following login information:
User name: admin | Password: admin
→ When logging in for the first time, the administration menu displays the First Setup Wizard to help with the basic configuration of OPENVAS SCAN.
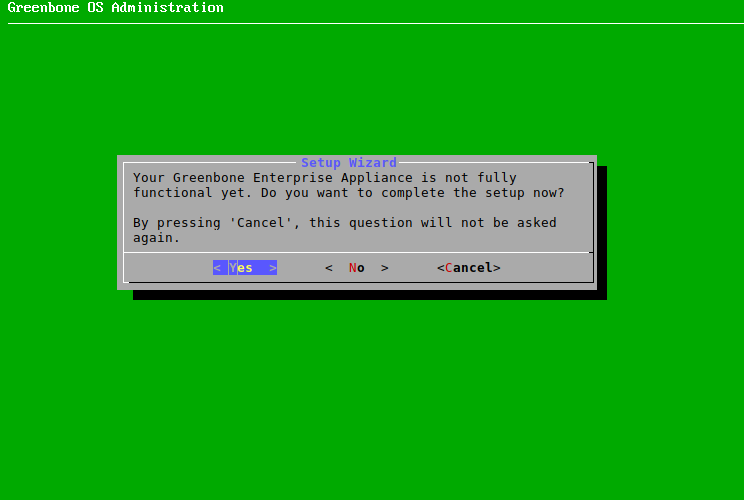
- Select Yes and press und Enter to open the Wizard.
Note: The wizard can be closed by selecting No and pressing Enter. Steps that have not yet been completed will be displayed again at the next login.
The wizard can also be closed by selecting Cancel and pressing Enter. In this case, however, incomplete steps will not be displayed again.
Any step can be skipped by selecting Skip or No and pressing Enter. Skipped steps will be displayed again at the next login.→ It is asked whether a web user should be created. This is required to use the web interface.
Note: The first web administrator (web user) created is automatically the Feed Import Owner (more information about the Feed Import Owner here). - Select Yes and press Enter.
- Enter the user name of the web administrator.
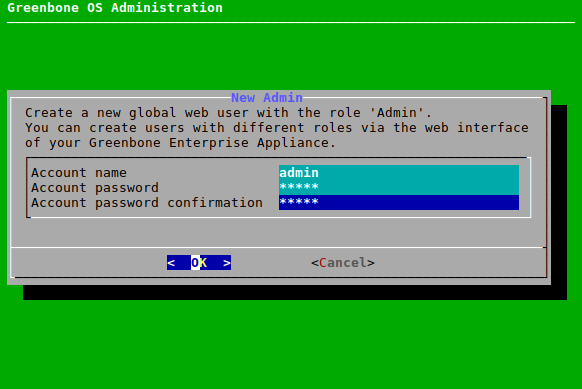
- Enter the password of the web administrator twice.
- Select OK and press Enter.
→ A message informs the user that the web administrator has been created. - Press Enter to close the message.
Note: If no valid feed subscription key is stored on the appliance, the appliance only uses the public OPENVAS COMMUNITY FEED and not the OPENVAS ENTERPRISE FEED.
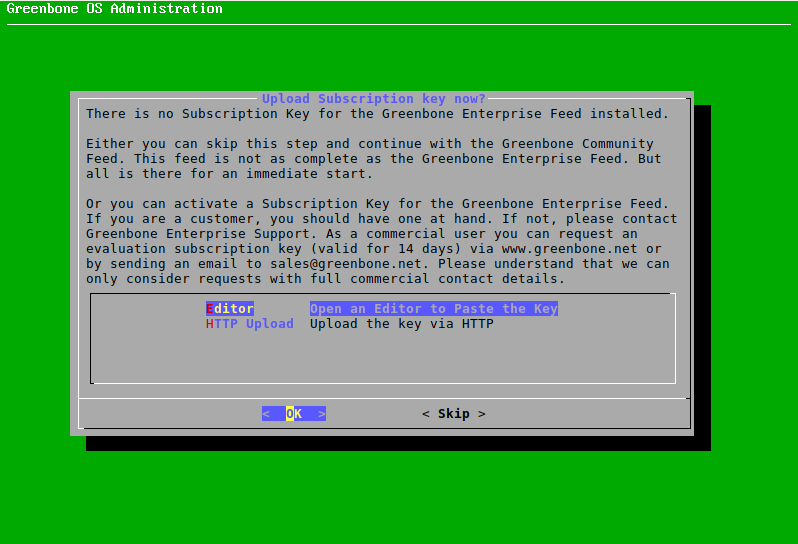
The key can be entered or uploaded as follows: - Select Editor and press Enter.
→ The editor is opened. - Enter the subscription key.
- Press Strg + X.
- Press Y to save the changes.
- Press Enter.
or
- Select HTTP Upload and press Enter.
- Open the web browser and enter the displayed URL.
- Click Browse….
- Select the subscription key in the file system.
- Click Upload.
→ A message shows that the key has been imported successfully. - Press Enter.
After the last step, a status check is performed. A message shows the result.
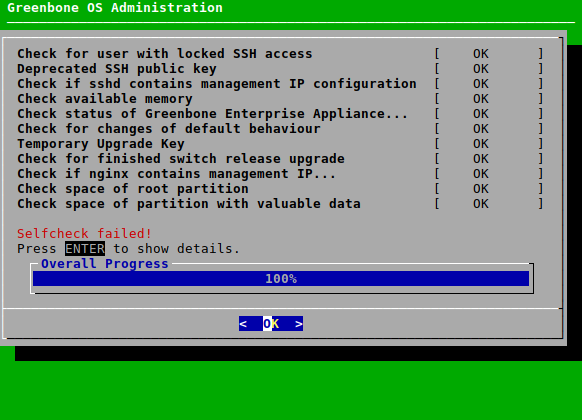
If there are any incomplete or skipped steps, the First Setup Wizard will reappear at the next login.
Accessing the Web Interface
The web interface can be accessed as follows:
- Open the web browser.
- Enter the IP address of the appliance’s web interface.
Note: The IP address of the appliance’ s web interface can be displayed as follows:
- During the login to the administration menu
- By selecting About and pressing Enter in the administration menu
- Log in with the web administrator created during setup.
→ The web interface is opened.
Additional Notes
- It is recommended to change the password of the administrator as described in the manual.
- OPENVAS FREE uses a self-signed TLS certificate. When logging in to the web interface, this is considered insecure by the web browser and must therefore be added to the web browser as an exception.
- Shutting down or restarting the virtual machine should only be done via the menu option Maintenance > Power in the administration menu to ensure that important system processes, such as the feed update, are not interrupted.
2. Note
OPENVAS FREE serves as a quick and easy testing tool for the OPENVAS SCAN on Microsoft Windows, Linux and macOS.
- By default, OPENVAS FREE uses the OPENVAS COMMUNITY FEED instead of the more comprehensive OPENVAS ENTERPRISE FEED.
- Feed updates are available on a regular basis, but OPENVAS FREE itself cannot be updated. The commercial OPENVAS SCAN can be updated seamlessly and includes access to the OPENVAS ENTERPRISE FEED.
- Access to the OPENVAS ENTERPRISE SUPPORT is only available for owners of a Greenbone Enterprise Support subscription key. No support is available for OPENVAS FREE by default.
- Exchange about functions and open questions about OPENVAS FREE happens on a voluntarily basis in the Greenbone Community Portal.
- Advanced features, e.g., TLS certificate management, schedules, notifications, integrated backups, master-sensor functionality, VLANs, network namespaces, and Airgap support, are not included in OPENVAS FREE. All mentioned features are available on the OPENVAS SCAN, which can be requested from Greenbone.
3. Latest Version
Version:
25.0.1
Oracle VirtualBox
1. Instruction
Requirements
- Compatibility: Oracle VirtualBox 6.1 or higher
- Minimum requirements: 2 CPUs, 5 GB RAM
- Virtual network adapter with direct Internet connection
Note: With default settings, OPENVAS FREE uses bridged networking and expects an IP address from a DHCP server. This may be reconfigured.
Importing OPENVAS FREE
- Download OVA file OPENVAS FREE.
- Download and install Oracle VirtualBox for the operating system used.
- Start VirtualBox.
- Select File > Import Appliance… in the menu bar.
- Click
 and select the OVA file of the appliance in the file system.
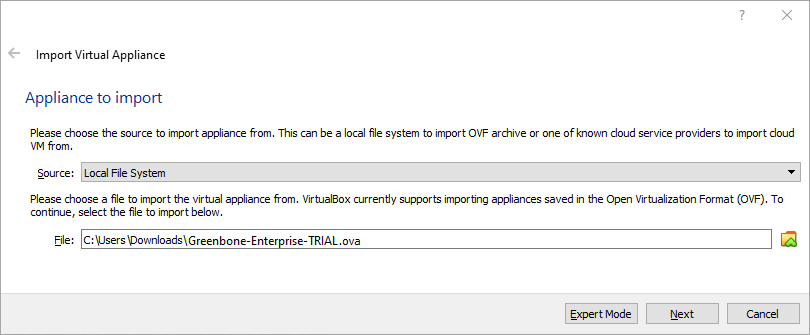
- Click Next.
→ The appliance settings are displayed.
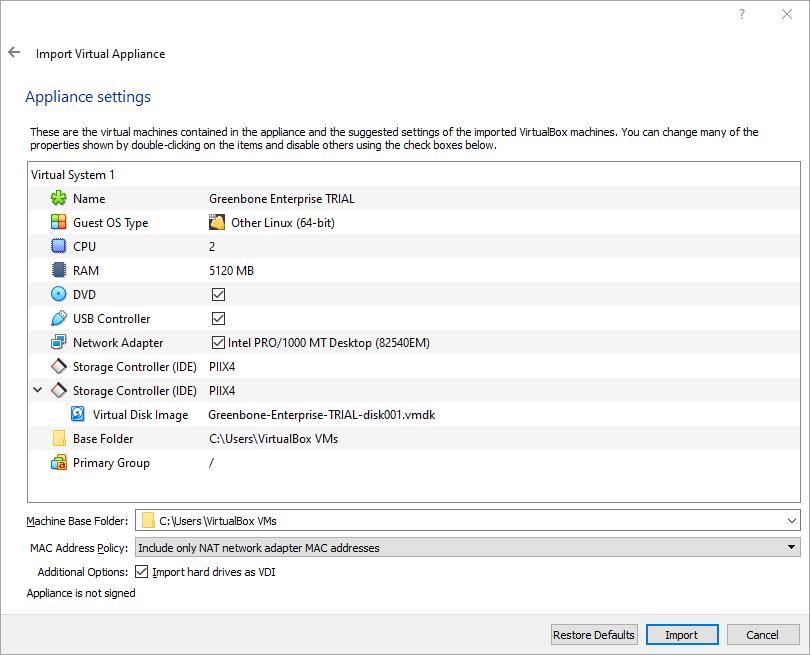
- Check the configuration of the virtual machine.
Values can be changed by double-clicking in the input field of the corresponding value. - Click Import.
→ The appliance is being imported. This process can take up to 10 minutes.
When the appliance has been imported, it will appear in the left column in VirtualBox. - Select the appliance in the list and click Start.
→ If an error message is displayed, continue with step 10.
If no error message is displayed, the administration menu is opened and allows to proceed with the general system setup. - Select the appliance in the list and click Settings.
- Select Network > Adapter 1.
- Choose the correct network adapter in the drop-down list Name.
- Click OK.
- Select the appliance in the list and click Start.
→ The administration menu is opened and allows to proceed with the general system setup.
Performing a General System Setup
- Log in using the following login information:
User name: admin | Password: admin
→ When logging in for the first time, the administration menu displays the First Setup Wizard to help with the basic configuration of OPENVAS SCAN.
- Select Yes and press und Enter to open the Wizard.
Note: The wizard can be closed by selecting No and pressing Enter. Steps that have not yet been completed will be displayed again at the next login.
The wizard can also be closed by selecting Cancel and pressing Enter. In this case, however, incomplete steps will not be displayed again.
Any step can be skipped by selecting Skip or No and pressing Enter. Skipped steps will be displayed again at the next login.→ It is asked whether a web user should be created. This is required to use the web interface.
Note: The first web administrator (web user) created is automatically the Feed Import Owner (more information about the Feed Import Owner here). - Select Yes and press Enter.
- Enter the user name of the web administrator.
- Enter the password of the web administrator twice.
- Select OK and press Enter.
→ A message informs the user that the web administrator has been created. - Press Enter to close the message.
Note: If no valid feed subscription key is stored on the appliance, the appliance only uses the public OPENVAS COMMUNITY FEED and not the OPENVAS ENTERPRISE FEED.
The key can be entered or uploaded as follows: - Select Editor and press Enter.
→ The editor is opened. - Enter the subscription key.
- Press Strg + X.
- Press Y to save the changes.
- Press Enter.
or
- Select HTTP Upload and press Enter.
- Open the web browser and enter the displayed URL.
- Click Browse….
- Select the subscription key in the file system.
- Click Upload.
→ A message shows that the key has been imported successfully. - Press Enter.
After the last step, a status check is performed. A message shows the result.
If there are any incomplete or skipped steps, the First Setup Wizard will reappear at the next login.
Accessing the Web Interface
The web interface can be accessed as follows:
- Open the web browser.
- Enter the IP address of the appliance’s web interface.
Note: The IP address of the appliance’ s web interface can be displayed as follows:
- During the login to the administration menu
- By selecting About and pressing Enter in the administration menu
- Log in with the web administrator created during setup.
→ The web interface is opened.

Additional Notes
- It is recommended to change the password of the administrator as described in the manual.
- OPENVAS FREE uses a self-signed TLS certificate. When logging in to the web interface, this is considered insecure by the web browser and must therefore be added to the web browser as an exception.
- Shutting down or restarting the virtual machine should only be done via the menu option Maintenance > Power in the administration menu to ensure that important system processes, such as the feed update, are not interrupted.
2. Note
OPENVAS FREE serves as a quick and easy testing tool for the OPENVAS SCAN on Microsoft Windows, Linux and macOS.
-
By default, OPENVAS FREE uses the OPENVAS COMMUNITY FEED instead of the more comprehensive OPENVAS ENTERPRISE FEED.
-
Feed updates are available on a regular basis, but OPENVAS FREE itself cannot be updated. The commercial OPENVAS SCAN can be updated seamlessly and includes access to the OPENVAS ENTERPRISE FEED.
-
Access to the Greenbone Enterprise Support is only available for owners of a OPENVAS ENTERPRISE FEED subscription key. No support is available for OPENVAS FREE by default.
-
Exchange about functions and open questions about OPENVAS FREE happens on a voluntarily basis in the Greenbone Community Portal.
- Advanced features, e.g., TLS certificate management, schedules, notifications, integrated backups, master-sensor functionality, VLANs, network namespaces, and Airgap support, are not included in OPENVAS FREE. All mentioned features are available on the OPENVAS SCAN, which can be requested from Greenbone.
3. Latest Version
Version:
25.0.1